你不知道的nginx
你不知道的nginx
参考来源
原文地址
location的匹配规则
- = 表示精确匹配。只有请求的url路径与后面的字符串完全相等时,才会命中。
- ^~ 表示如果该符号后面的字符是最佳匹配,采用该规则,不再进行后续的查找。
- ~ 表示该规则是使用正则定义的,区分大小写。
- ~* 表示该规则是使用正则定义的,不区分大小写。
注意的是,nginx的匹配优先顺序按照上面的顺序进行优先匹配,而且注意的是一旦某一个匹配命中直接退出,不再进行往下的匹配
剩下的普通匹配会按照最长匹配长度优先级来匹配,就是谁匹配的越多就用谁。
server {
    server_name website.com;
    location /document {
        return 701;
    }
    location ~* ^/docume.*$ {
        return 702;
    }
    location ~* ^/document$ {
        return 703;
    }

}
curl -I  website.com:8080/document 702
# 匹配702 因为正则的优先级更高,而且正则是一旦匹配到就直接退出 所以不会再匹配703
server {
server_name website.com;
location ~* ^/docume.*$ {
return 701;
}
location ^~ /doc {
return 702;
}
location ~* ^/document$ {
return 703;
}
}
curl http://website.com/document
HTTP/1.1 702
# 匹配702 因为 ^~精确匹配的优先级比正则高 也是匹配到之后支持退出server {
server_name website.com;
location /doc {
return 702;
}
location /docu {
return 701;
}
}
# 701 前缀匹配匹配是按照最长匹配,跟顺序无关history模式、跨域、缓存、反向代理
# html设置history模式
location / {
    index index.html index.htm;
    proxy_set_header Host $host;
    # history模式最重要就是这里
    try_files $uri $uri/ /index.html;
    # index.html文件不可以设置强缓存 设置协商缓存即可
    add_header Cache-Control 'no-cache, must-revalidate, proxy-revalidate, max-age=0';
}

# 接口反向代理
location ^~ /api/ {
    # 跨域处理 设置头部域名
    add_header Access-Control-Allow-Origin *;
    # 跨域处理 设置头部方法
    add_header Access-Control-Allow-Methods 'GET,POST,DELETE,OPTIONS,HEAD';
    add_header Access-Control-Allow-Headers 'keep-alive,user-agent,x-requested-with,cache-control,content-type';
     if ($request_method = 'options') {
        return 204;
    }
    # 改写路径
    rewrite ^/api/(.*)$ /$1 break;
    # 反向代理
    proxy_set_header Host $host;
    proxy_set_header X-Real-IP $remote_addr;
    proxy_set_header REMOTE-HOST $remote_addr;
    proxy_set_header X-Forwarded-For $proxy_add_x_forwarded_for;
    proxy_pass http://static_env;
}

location ~* \.(?:css(\.map)?|js(\.map)?|gif|svg|jfif|ico|cur|heic|webp|tiff?|mp3|m4a|aac|ogg|midi?|wav|mp4|mov|webm|mpe?g|avi|ogv|flv|wmv)$ {
    # 静态资源设置七天强缓存
    expires 7d;
    access_log off;
}
快速实现简单的访问限制
location / {
    deny  192.168.1.100;
    allow 192.168.1.10/200;
    allow 10.110.50.16;
    deny  all;
}
解决跨域 的另一个方法
 #请求跨域,这里约定代理请求url path是以/apis/开头
location ^~/apis/ {
    # 这里重写了请求,将正则匹配中的第一个()中$1的path,拼接到真正的请求后面,并用break停止后续匹配
    rewrite ^/apis/(.*)$ /$1 break;
    proxy_pass https://www.kaola.com/;
}在页面代码里,把请求url换成http://xxx.com/apis/xxx.html 。这样就可以正常请求到数据
适配PC与移动环境
存在PC站和H5站两个站点,根据用户的浏览环境自动切换站点
location / {
    # 移动、pc设备适配
    if ($http_user_agent ~* '(Android|webOS|iPhone|iPod|BlackBerry)') {
        set $mobile_request '1';
    }
    if ($mobile_request = '1') {
        rewrite ^.+ http://h5.com;
    }
}
合并请求
前端性能优化中重要一点就是尽量减少http资源请求的数量。通过nginx-http-concat模块(淘宝开发的第三方模块,需要单独安装)用一种特殊的请求url规则(例子:example.com/??1.js,2.js,3.js ),前端可以将多个资源的请求合并成一个请求,后台Nginx会获取各个资源并拼接成一个结果进行返回。例如上面的例子通过一个请求将1.js,2.js,3js三个js资源合并成一个请求,减少了浏览器开销。
本地server xxx.com为例,static/js文件夹下有三个文件,文件内容很简单,分别为

# js资源http-concat
# nginx-http-concat模块的参数远不止下面三个,剩下的请查阅文档
location /static/js/ {
    concat on; # 是否打开资源合并开关
    concat_types application/javascript; # 允许合并的资源类型
    concat_unique off; # 是否允许合并不同类型的资源
    concat_max_files 5; # 允许合并的最大资源数目
}当在浏览器请求http://mysite-base.com/static/js/??a.js,b.js,c.js 时,发现三个js被合并成一个返回了,如下图:

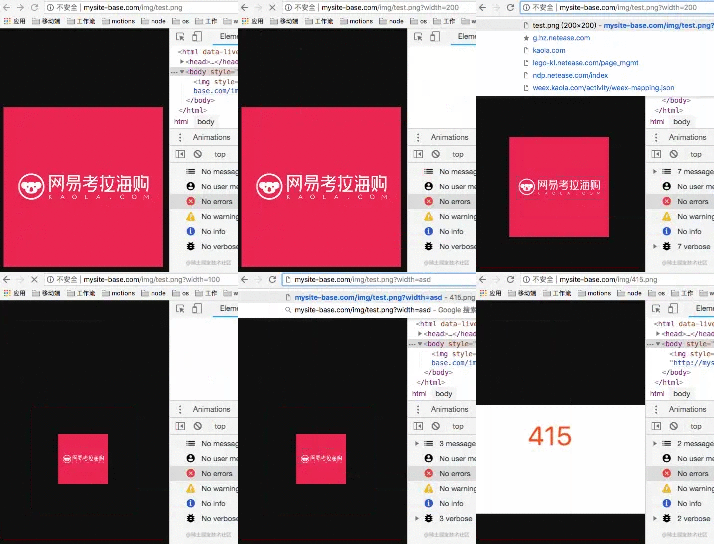
图片处理
在前端开发中,经常需要不同尺寸的图片。现在的云储存基本对图片都提供有处理服务(一般是通过在图片链接上加参数)。其实用Nginx,可以通过几十行配置,搭建出一个属于自己的本地图片处理服务,完全能够满足日常对图片的裁剪/缩放/旋转/图片品质等处理需求。要用到ngx_http_image_filter_module模块。这个模块是非基本模块,需要安装。
下面是图片缩放功能部分的Nginx配置:
# 图片缩放处理
# 这里约定的图片处理url格式:以 mysite-base.com/img/路径访问
location ~* /img/(.+)$ {
    alias /Users/cc/Desktop/server/static/image/$1; #图片服务端储存地址
    set $width -; #图片宽度默认值
    set $height -; #图片高度默认值
    if ($arg_width != "") {
        set $width $arg_width;
    }
    if ($arg_height != "") {
        set $height $arg_height;
    }
    image_filter resize $width $height; #设置图片宽高
    image_filter_buffer 10M;   #设置Nginx读取图片的最大buffer。
    image_filter_interlace on; #是否开启图片图像隔行扫描
    error_page 415 = 415.png; #图片处理错误提示图,例如缩放参数不是数字
}
这里只是最基本的配置。此外,可以通过proxy_cache配置Nginx缓存,避免每次请求都重新处理图片,减少Nginx服务器处理压力;还以可以通过和nginx-upload-module一起使用加入图片上传的功能等。
页面内容修改
Nginx可以通过向页面底部或者顶部插入额外的css和js文件,从而实现修改页面内容。这个功能需要额外模块的支持,例如:nginx_http_footer_filter或者ngx_http_addition_module (都需要安装)。
工作中,经常需要切换各种测试环境,而通过switchhosts等工具切换后,有时还需要清理浏览器dns缓存。可以通过页面内容修改+Nginx反向代理来实现轻松快捷的环境切换。
这里首先在本地编写一段js代码(switchhost.js),里面的逻辑是:在页面插入hosts切换菜单以及点击具体某个环境时,将该host的ip和hostname储存在cookie中,最后刷新页面;接着编写一段css代码(switchhost.css)用来设置该hosts切换菜单的样式。
然后Nginx脚本配置:
server {
        listen 80;
        listen  443 ssl;
        expires -1;
        # 想要代理的域名
        server_name m-element.kaola.com;
        set $root /Users/cc/Desktop/server;
        charset utf-8;
        ssl_certificate      /usr/local/etc/nginx/m-element.kaola.com.crt;
        ssl_certificate_key  /usr/local/etc/nginx/m-element.kaola.com.key;

        # 设置默认$switch_host,一般默认为线上host,这里的1.1.1.1随便写的
        set $switch_host '1.1.1.1';
        # 设置默认$switch_hostname,一般默认为线上'online'
        set $switch_hostname '';
        # 从cookie中获取环境ip
        if ($http_cookie ~* "switch_host=(.+?)(?=;|$)") {
            set $switch_host $1;
        }

        # 从cookie中获取环境名
        if ($http_cookie ~* "switch_hostname=(.+?)(?=;|$)") {
            set $switch_hostname $1;
        }

        location / {
            expires -1;
            index index.html;
            proxy_set_header Host $host;
            #把html页面的gzip压缩去掉,不然sub_filter无法替换内容
            proxy_set_header Accept-Encoding '';
            #反向代理到实际服务器ip
            proxy_pass  http://$switch_host:80;
            #全部替换
            sub_filter_once off;
            #ngx_http_addition_module模块替换内容。
            # 这里在头部插入一段css,内容是hosts切换菜单的css样式
            sub_filter '</head>' '</head><link rel="stylesheet" type="text/css" media="screen" href="/local/switchhost.css" />';
            #将页面中的'网易考拉'文字后面加上环境名,便于开发识别目前环境
            sub_filter '网易考拉' '网易考拉:${switch_hostname}';
            #这里用了另一个模块nginx_http_footer_filter,其实上面的模块就行,只是为了展示用法
            # 最后插入一段js,内容是hosts切换菜单的js逻辑
            set $injected '<script language="javascript" src="/local/switchhost.js"></script>';
            footer '${injected}';
        }
        # 对于/local/请求,优先匹配本地文件
        # 所以上面的/local/switchhost.css,/local/switchhost.js会从本地获取
        location ^~ /local/ {
            root $root;
        }
}
这个功能其实为Nginx在前端开发中的应用提供了无限可能。例如,可以通过区分本地、测试和线上环境,为本地/测试环境页面增加很多开发辅助功能:给本地页面加一个常驻二维码便于手机端扫码调试;本地调试线上页面时,在js文件底部塞入sourceMappingURL,便于本地debug等等。
负载均衡
基于upstream做负载均衡,中间会涉及一些相关的策略比如ip_hash、weight
upstream backserver{
    # 哈希算法,自动定位到该服务器 保证唯一ip定位到同一部机器 用于解决session登录态的问题
    ip_hash;
    server 127.0.0.1:9090 down; (down 表示单前的server暂时不参与负载)
    server 127.0.0.1:8080 weight=2; (weight 默认为1.weight越大,负载的权重就越大)
    server 127.0.0.1:6060;
    server 127.0.0.1:7070 backup; (其它所有的非backup机器down或者忙的时候,请求backup机器)
}
灰度部署
如何根据headers头部来进行灰度,下面的例子是用cookie来设置
如何获取头部值在nginx中可以通过$http_xxx来获取变量
upstream stable {
    server xxx max_fails=1 fail_timeout=60;
    server xxx max_fails=1 fail_timeout=60;
 }
upstream canara {
   server xxx max_fails=1 fail_timeout=60;
}

server {
    listen 80;
    server_name  xxx;
    # 设置默认
    set $group "stable";

    # 根据cookie头部设置接入的服务
    if ($http_cookie ~* "tts_version_id=canara"){
        set $group canara;
    }
    if ($http_cookie ~* "tts_version_id=stable"){
        set $group stable;
    }
    location / {
        proxy_pass http://$group;
        proxy_set_header   Host             $host;
        proxy_set_header   X-Real-IP        $remote_addr;
        proxy_set_header   X-Forwarded-For $proxy_add_x_forwarded_for;
        index  index.html index.htm;
    }
}
优雅降级
常用于ssr的node服务挂了返回500错误码然后降级到csr的cos桶或者nginx中
优雅降级主要用error_page参数来进行降级指向备用地址。
upstream ssr {
    server xxx max_fails=1 fail_timeout=60;
    server xxx max_fails=1 fail_timeout=60;
 }
upstream csr {
    server xxx max_fails=1 fail_timeout=60;
    server xxx max_fails=1 fail_timeout=60;
}

location ^~ /ssr/ {
    proxy_pass http://ssr;
    # 开启自定义错误捕获 如果这里不设置为on的话 会走向nginx处理的默认错误页面
    proxy_intercept_errors on;
    # 捕获500系列错误 如果500错误的话降级为下面的csr渲染
    error_page 500 501 502 503 504 = @csr_location

    # error_page 500 501 502 503 504 = 200 @csr_location
    # 注意这上面的区别 等号前面没有200 表示 最终返回的状态码已 @csr_location为准 加了200的话表示不管@csr_location返回啥都返回200状态码
}

location @csr_location {
    # 这时候地址还是带着/ssr/的要去除
    rewrite ^/ssr/(.*)$ /$1 break;
    proxy_pass http://csr;
    rewrite_log on;
}
webp根据浏览器自动降级为png
这套方案不像常见的由nginx把png转为webp的方案,而是先经由图床系统(node服务)上传两份图片:
- 一份是原图png
- 一份是png压缩为webp的图片(使用的是imagemin-webp)
然后通过nginx检测头部是否支持webp来返回webp图片,不支持的话就返回原图即可。这其中还做了错误拦截,如果cos桶丢失webp图片及时浏览器支持webp也要降级为png
http {
  include       /etc/nginx/mime.types;
  default_type  application/octet-stream;

  # 设置日志格式
  log_format  main  '$remote_addr - $remote_user [$time_local] "$request" '
  '$status $body_bytes_sent "$http_referer" '
  '"$http_user_agent" "$http_x_forwarded_for"'
  '"$proxy_host" "$upstream_addr"';

  access_log  /var/log/nginx/access.log  main;

  sendfile        on;
  keepalive_timeout  65;

  # 开启gzip
  gzip on;
  gzip_vary on;
  gzip_proxied any;
  gzip_comp_level 6;
  gzip_types text/plain text/css text/xml application/json application/javascript application/rss+xml application/atom+xml image/svg+xml;

  # 负载均衡 这里可以是多个cos桶地址即可
  upstream static_env {
    server xxx;
    server xxx;
  }

  # map 设置变量映射 第一个变量指的是要通过映射的key值 Accpet 第二个值的是变量别名
  map $http_accept $webp_suffix {
    # 默认为 空字符串
    default   "";
    # 正则匹配如果Accep含有webp字段 设置为.webp值
    "~*webp"  ".webp";
  }
  server {

    listen 8888;
    absolute_redirect off;    #取消绝对路径的重定向
    #网站主页路径。此路径仅供参考,具体请您按照实际目录操作。
    root /usr/share/nginx/html;

    location / {
      index index.html index.htm;
      proxy_set_header Host $host;
      try_files $uri $uri/ /index.html;
      add_header Cache-Control 'no-cache, max-age=0';
    }

    # favicon.ico
    location = /favicon.ico {
      log_not_found off;
      access_log off;
    }

    # robots.txt
    location = /robots.txt {
      log_not_found off;
      access_log off;
    }

    #
    location ~* \.(png|jpe?g)$ {
      # Pass WebP support header to backend
      # 如果header头部中支持webp
      if ($webp_suffix ~* webp) {
        # 先尝试找是否有webp格式图片
        rewrite ^/(.*)\.(png|jpe?g)$ /$1.webp break;
        # 找不到的话 这里捕获404错误 返回原始错误 注意这里的=号 代表最终返回的是@static_img的状态吗
        error_page 404 = @static_img;
      }
      proxy_intercept_errors on;
      add_header Vary Accept;
      proxy_pass http://static_env;
      proxy_set_header Host $http_host;
      expires 7d;
      access_log off;
    }

    location @static_img {
      #set $complete $schema $server_addr $request_uri;
      rewrite ^/.+$ $request_uri break;
      proxy_pass http://static_env;
      proxy_set_header Host $http_host;
      expires 7d;
    }


    # assets, media
    location ~* \.(?:css(\.map)?|js(\.map)?|gif|svg|jfif|ico|cur|heic|webp|tiff?|mp3|m4a|aac|ogg|midi?|wav|mp4|mov|webm|mpe?g|avi|ogv|flv|wmv)$ {
      proxy_pass http://static_env;
      proxy_set_header Host $http_host;
      expires 7d;
      access_log off;
    }


    error_page   500 502 503 504  /50x.html;
    location = /50x.html {
      root   /usr/share/nginx/html;
    }
  }
}
静态资源跨域
location ~ .*\.(gif|jpg|jpeg|png|bmp|svga)$
{
   # 允许 所有头部 所有域 所有方法
   add_header 'Access-Control-Allow-Origin' '*';
   add_header 'Access-Control-Allow-Headers' '*';
   add_header 'Access-Control-Allow-Methods' '*';
   # OPTIONS 直接返回204
   if ($request_method = 'OPTIONS') {
       return 204;
   }
    expires      30d;
}